
You love your sewing machine, don’t you? It’s your trusty sidekick for every project—until it starts making weird noises or sewing unevenly. That’s where sewing machine oiling comes in. Just like a car needs an oil change, your machine needs the right oil to run smoothly. But too much oil can clog it, and the wrong oil can cause it to break. How do you do it right?
By the end of this article, you’ll receive a checklist that outlines when, how, and what to oil on your sewing machine to keep it running safely, smoothly, and long-term.
Why Oiling Your Sewing Machine Is Important
Think of it like lubricating your sewing machine with a big glass of water after a long day of use. It keeps everything running smoothly. Without oil, friction accelerates wear, causes noise and breakdowns. A well-lubricated machine not only lasts longer, it also sews cleaner and is less likely to break threads or lose tension.
The Hidden Benefits of Regular Maintenance
Proper lubrication prevents rust, especially if you live in a humid area. It also prevents lint and dust from clogging the internal mechanisms, which can clog them over time. If you’ve ever wondered if you should lubricate your sewing machine, the answer is a resounding yes — as long as you do it right.
What Happens When You Neglect Oil?
Machines don’t come with a “check motor” light, but they do give off plenty of signs that your sewing machine needs oiling. A creaking noise, a stiff flywheel, or suddenly uneven stitches are all red flags. Ignoring these signs can lead to more serious problems, like bent needles or an overloaded motor. And no, can you use WD-40 on a sewing machine? Of course not — it’s a degreaser, not a lubricant, and it will clog up your work. Instead, use the proper best sewing machine oil.
Oil Keeps the Magic Alive
Have you ever opened up an old machine that still runs like clockwork? That’s the power of consistent sewing machine oiling tips. Modern machines require less attention, but they still need oil to prevent damage from friction. Whether you’re working with heavy denim or fine silk, a drop of the special compound in the right places is essential.

How Often Should You Oil a Sewing Machine?
Your sewing machine isn’t like your car — it won’t flash a warning light when it’s low on oil. But that doesn’t mean you should just improvise. Determining how often to oil your sewing machine depends on how often you use it. A machine that sews every day requires more attention than one that only goes out twice a year for Halloween costumes.
The Goldilocks Rule: Not Too Much, Not Too Little
Too much lubrication attracts lint and dust, turning your machine into a sticky mess. Too little, and you’ll start to hear ominous squeaks. Most manufacturers recommend lubricating your sewing machine every 8 to 10 hours of use. But who really monitors that? A simpler rule: If you sew weekly, a quick oil check should be done every month.
The video below walks you through the proper lubrication process so you can avoid excess oil that attracts lint and dust, as well as the dreaded squeaks from under-lubrication. Watching this quick visual guide will make our explanation above even clearer.
Listen to your machine (seriously, it talks)
You don’t need a mechanic’s ear to pick up on the signs that your sewing machine needs oiling:
- A subtle grinding noise as the needle rises and falls.
- The handwheel feels stiff when you turn it.
This is your machine’s way of saying, “Hey, I could use a little TLC.” Ignore these cues, and you’ll soon be dealing with skipped stitches or a jammed bobbin case.
Special Cases: Heavy Projects and Humid Climates
If you’re working with thick fabrics like denim or canvas, your machine is working harder. That means the parts are rubbing against each other more. Because of the extra friction, you’ll need to oil more often — maybe every 5-6 hours instead of 10. This includes areas with humid conditions. Moisture in the air can thin existing oil or cause rust, so a squirt of the best sewing machine oil every few weeks is a smart preventative.
What about vintage vs. modern machines?
Older models are built to be reliable, but they require more frequent sewing machine maintenance. Many vintage varieties require oiling after every 2-3 uses because they don’t have the self-lubricating parts of newer machines. Modern computerized machines often have sealed bearings. They may only need service once or twice a year. Always check the manual — because yes, you should still have this thing.
The “Oops, I Forgot” Timeline
Haven’t oiled in… a while? Don’t panic. If your machine is still running smoothly, you’re good to go. But if it’s been six months or more, it’s time for a quick guide to choosing sewing machine oil. Get the right lubricant, apply it to key points, and you’re back in business.

When in doubt, test
Not sure if it’s time? Sew a piece of fabric. If the stitches look uneven or the machine sounds like it’s protesting, grab a bottle of oil. Sewing machine lubrication tips: Try to do it early rather than wait until it breaks down completely.
Step-by-Step: How to Properly Oil Your Sewing Machine
Knowing how to properly oil a sewing machine is what separates the pros from the people who end up buying a new machine. It’s not rocket science, but there’s definitely a right way and about a dozen wrong ways to do it.

Get Armed Before You Begin
First, you’ll need the right supplies. Grab:
- some of the best sewing machine oil
- a clean microfiber cloth
- a few cotton swabs.
Make sure your machine is turned off and unplugged. Getting an electric shock while trying to perform maintenance will really ruin your day. Clean a well-lit work area where you won’t lose any small parts.
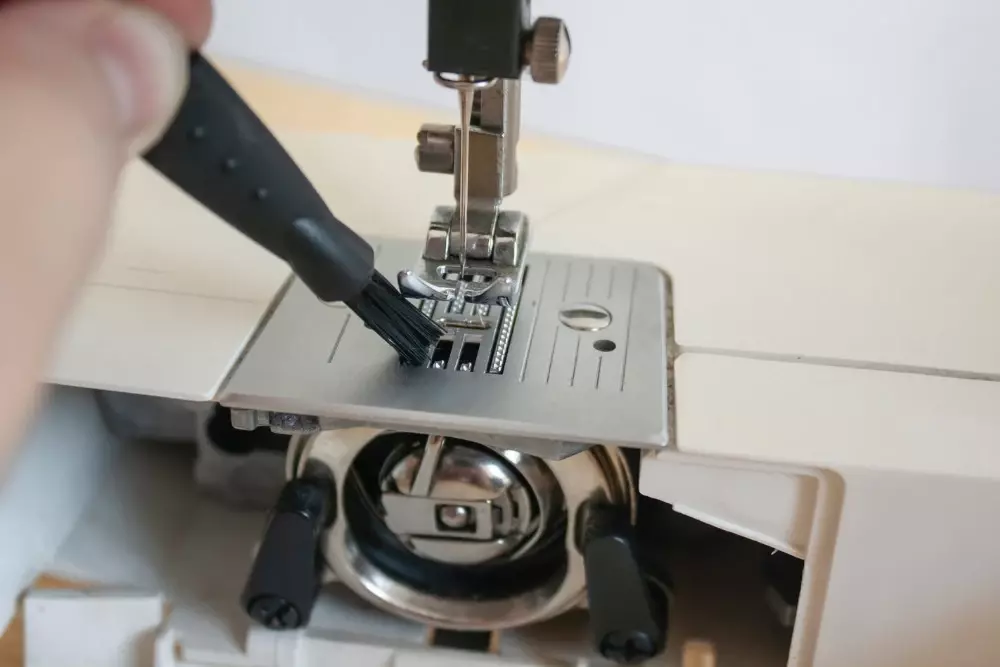
A Deep Clean Is Needed First
This is where most people go wrong – they jump straight to oiling without doing the prep work. Before you even think about lubricating your sewing machine parts, you need to remove all the lint buildup. Use a small brush (the one that came with your machine is a good choice) to clean the bobbin area, feed teeth, and other places where lint likes to hide. A can of compressed air can help blow out stubborn dirt.
Finding the Best Spots
It’s important to understand [where to oil your sewing machine. Read the instructions, but generally you’ll want to work on:
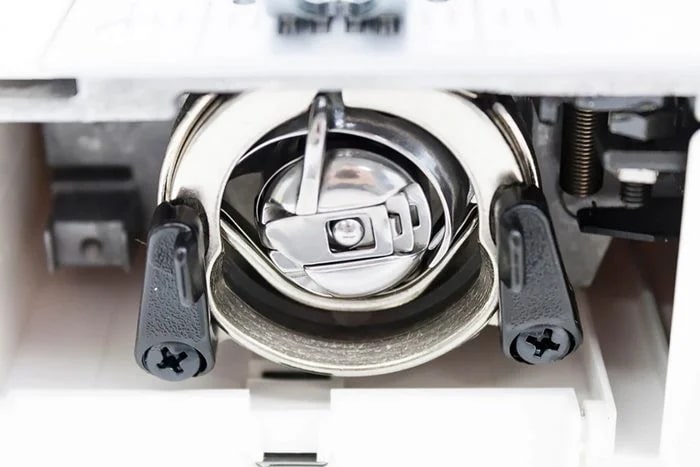
- The bobbin case area (remove it first).
- The needle bar (raise it to its highest position).
- Any visible moving metal parts that rub against each other.
- The flywheel shaft, if it feels stiff.

The Art of Application
This isn’t a “more is better” situation. We’re talking drops—literally one drop at a time. Use the precision tip on your bottle or a needle applicator. After applying, turn the flywheel a few times by hand to distribute the oil. Wipe off any excess with a cloth – any remaining oil will just attract more lint and defeat the purpose of maintaining a sewing machine.
Test Run
When all looks good, it’s show time. Load the machine with scrap fabric and give it a test drive. Listen for any odd noises remaining and check that the stitches are even. If something still isn’t right, you’ve missed a spot in your sewing machine oiling guide.
Special Considerations for Different Machines
If you’re working with a vintage model, you may need to oil a few extra spots that modern machines don’t require. Computerized machines often have specific spots that should never be oiled – if in doubt, check your manual. This is where general sewing machine oiling tips can lead to error.

The Waiting Game
After oiling a sewing machine, some people like to let it sit for an hour before using it. This gives the oil time to soak in. While you wait, it’s time to tidy up your bobbins or wind the thread you’re planning to use.
What Type of Oil Should You Use and What to Avoid
Choosing the right lubricant for your sewing machine can mean the difference between smooth operation and sticky mess. Not all oils are created equal, but using the wrong type can lead to costly consequences.
Recommended oil for sewing machines
The real best sewing machine oil is specifically made for the job. It’s lightweight (usually ISO 10 or 20 viscosity), clear, and refined to prevent gum formation. Brands like Singer, Janome, and Tri-Flow offer great inexpensive options. This stuff stays where you apply it and won’t break down rubber or plastic parts over time.

The Kitchen Cabinet Trap
We’ve all been tempted to grab whatever we can get our hands on when we’re in a pinch. Here’s why you shouldn’t:
- Vegetable oils go rancid and become sticky.
- Baby oil contains additives that attract dust.
- 3-in-1 oil is too heavy for most modern machines.
- Motor oil is a disaster waiting to happen.
The WD-40 Debate
Let’s settle this once and for all – can you use WD-40 on a sewing machine? Of course not. WD-40 is a water displacer and degreaser, not a lubricant. It may seem to help at first by loosening stuck parts, but it will quickly evaporate, leaving your machine drier than before. Keep in mind that it can damage some plastic and rubber parts in computer models.

Special Cases: Synthetic vs. Mineral
For most home sewers, standard mineral sewing machine oil is fine. But if you have an industrial machine or work in extreme temperatures, synthetic oils may be worth the extra cost. They hold up better to heat and last longer between uses. Just check your manual first, as some manufacturers specifically advise against using synthetic oils.
Lubrication Option (for Specific Parts)
While we’ve focused on sewing machine lubrication tips, it’s worth noting that some older machines require a special lubricant rather than oil for certain components, such as gears. A white lithium compound is commonly used. This is one area where it’s important to focus on the manual. Modern machines rarely need lubrication.
Where to Buy the Good Stuff
Finding the right [best sewing machine oil] is now easier than ever:
- Your local fabric/sewing supply store always has it.
- Amazon has a few well-known brands.
- Some hardware stores carry it in the sewing section.
- Manufacturers’ websites often sell their own formulas.
Avoid random unknown oils from shady online sellers – a few dollars saved is not worth the potential damage to your machine.

Storage matters too
Store the oil in its original bottle with a tight-fitting lid, upright, in a cool, dark place. Exposure to heat and sunlight can degrade the quality over time. If the oil looks cloudy or has particles floating in it, throw it away and get new oil – contaminated oil defeats the purpose of maintaining a sewing machine.
Signs Your Sewing Machine Needs Oil
Learning to spot these clues early can help you avoid frustrating sewing sessions and costly repairs in the future.
That annoying squeak you can’t ignore
When metal rubs against metal without proper lubrication, it creates that distinctive high-pitched sound. If your machine makes a mouse-like noise every time you press the pedal, it’s begging for sewing machine oiling tips. The noise usually starts out small, but gradually gets worse if ignored.
When moving parts resist
A well-oiled machine should run smoothly and with minimal effort. If it takes extra effort to turn the flywheel or the needle bar moves sluggishly, these are classic signs that your sewing machine needs lubrication. This resistance means that friction has taken over where the oil should be doing its job.
The Mystery of Disappearing Thread Quality
Suddenly uneven stitches? Frequent thread breakage? Tension issues that come out of nowhere? Before you blame your technique or materials, consider whether basic sewing machine maintenance might be the answer. A lack of lubrication causes subtle timing issues that manifest themselves in stitch problems.
That weird burning smell no one talks about
When components rub against each other without the proper oil, they produce heat or a distinct hot metal odor. If your machine smells like it’s working too hard (and not in a good way), turn it off immediately and check your sewing machine oil manual for proper lubrication points.
Visible rust or corrosion spots
While this indicates a more serious problem, rust spots on internal metal parts mean that moisture has overcome your machine’s defenses. Regularly lubricating your sewing machine components creates a protective barrier against moisture. If you see orange discoloration, it’s time to intervene. Do this after gently cleaning the affected areas.
The bobbin area feels rough
Remove the bobbin case and turn the mechanism by hand. It should spin freely without sticking. Any gritty or grinding sensations here indicate that the area needs cleaning and fresh oil. This area works especially hard and often indicates the need for its first oiling.

Your machine is getting louder overall
In addition to individual squeaks, an overall increase in operating noise indicates that the moving parts are not sliding as they should. Compare how your machine sounds today to when it was new. This gradual change often indicates a need for oiling rather than a mechanical failure.
Seasonal changes affect performance
Machines often find themselves in need of oiling when humidity drops in the winter or spikes in the summer. If your machine is acting up when the weather changes, it’s a sign that the existing oil protection is no longer doing its job. This is relevant for determining how often to oil a sewing machine in different climates.

Forgotten Machine Syndrome
If you haven’t used your machine in months (no judgment here), it probably needs some attention before use. Oil can dry out or collect dust over time, leaving parts vulnerable. A quick refresh after following the proper sewing machine maintenance steps will prevent problems when you’re ready to sew again.
Oiling Tips for Different Machine Types: Vintage vs. Modern
Not all sewing machines are created equal when it comes to sewing machine oiling and maintenance. The classic Singer from Grandma’s attic and your shiny new computer model have different consumption rates. Knowing these differences will help both machines run smoothly for years to come.
Quick Reference: Maintenance by Machine Type
Don’t guess. Use this table to find the exact schedule and oil type for your specific machine model.

Vintage Machines: Oil Guzzlers
These heavy metal workhorses of decades past were built with sewing machine oiling tips that reflected their era. They typically need:
- More frequent oiling (often after every major project).
- Additional lubrication points that modern machines don’t have.
- Sometimes a special compound instead of oil for certain components.
- Special attention to visible moving parts.
The flywheel alone on many vintage models has three separate lubrication points. Miss one, and you’ll start to hear that telltale sound of metal rubbing on metal.

Modern Mechanical Models: Intermediate Maintenance
Modern non-computerized machines strike a balance between old-school needs and modern convenience. They typically:
- Require oil every 8-10 hours of use.
- Have fewer, more strategic lubrication points.
- Often include self-lubricating bushings in high-wear areas.
Lighter viscosity oils can be used. Check your owner’s manual before doing so. Some new mechanical models have surprising oil-free zones you wouldn’t guess.
Computerized Machines: Low-Maintenance Cousins
This fancy touchscreen model may seem high-tech. Sewing machine maintenance is simpler:
- Many have permanently lubricated parts that never need oil.
- Often just 2-3 specific lubrication points.
- Require special care for electronic components.
- Typically only require attention 1-2 times a year.
The biggest mistake here? Assuming they don’t need oil at all. Even the most advanced models have a few areas that require periodic maintenance.

Industrial Machines: Built for Constant Care
If you’re working with commercial-grade equipment, forget about all the maintenance that goes into home machines. These beasts:
- Often have automatic oil reservoirs.
- May require daily lubrication under heavy use.
- Need special industrial oils.
- Require a strict schedule to prevent breakdowns.
Treat them like a home machine, and you’ll be replacing expensive parts too soon.
Forgotten Middle Children: 1970s-’90s Models
These transitional-era machines combine features of both worlds:
- Some have nylon gears that never need to be lubricated.
- Others mimic vintage lubrication patterns.
- Many have hard-to-find manuals with important details.
With these, learning your exact model is worth the effort—general sewing machine oil guide advice often doesn’t take your unique needs into account.
Special cases: overlocks and embroidery machines
Completely different beasts, these specialists need:
- Certain types of oils (some embroidery models require special formulations).
- Maintenance of loopers and knives on overlocks.
- Attention to hidden mechanisms under covers.
- Often more frequent maintenance due to higher operating speeds.
Their complex mechanisms leave less room for errors when lubricating.
Common Sewing Machine Oiling Mistakes and How to Avoid Them
It’s easy to screw up your sewing machine oiling maintenance no matter what you do. These mistakes may seem minor, but over time they can cause headaches.

Grab the nearest bottle
That three-in-one oil in the garage? The olive oil in your kitchen? They’re a recipe for trouble. Household oils clog, attract dirt, and can even corrode parts. The right best sewing machine oil is cheap and lasts forever – no point in improvising.

Skipping the first cleaning
Treating a dirty machine is like putting fresh icing on a stale cake – it doesn’t solve the problem. Lint and old oil mix into a grainy paste. It wears out parts. Always dust, wipe away dirt, and let everything dry before adding fresh lube. Five minutes of good sewing machine maintenance now will save hours of frustration later.
Lubricating the wrong parts
Not all moving parts need oil. Plastic gears? Leave them dry. Tension discs? No-oil zone. Belts, rubber wheels, electronic components – keep the oil away. Your sewing machine oil manual will tell you what to focus on.
Assuming that lubrication alone lasts forever
Machines are not self-sufficient. Heavy users may need monthly maintenance; Occasional runoff can stretch it out for months. Humid climates require more frequent maintenance. Track your rhythm to figure out how often to lubricate your sewing machine. Do it the same way you would when servicing a car. Your machine will thank you.
It’s easy to forget when you last oiled your machine, especially if you sew sporadically. Don’t rely on memory. Download our printable maintenance log, fill in your machine’s specific oil requirements, and keep it in your sewing drawer.


Ignoring the Warning Signs
That new squeak? A slight stiffness in the flywheel? Your machine isn’t being dramatic—it’s asking for help. Ignoring the signs that your sewing machine needs lubrication leads to more serious problems, like skipped stitches or a frozen needle bar.
Getting Creative with Oil Blends
Mixing oils or adding mystery ingredients may seem clever, but it’s a gamble. Unpredictable viscosity, chemical reactions, and voided warranties aren’t worth the effort. Stick to sewing machine lubrication tips that actually work.

Forgetting the Finishing Touches
Lubrication isn’t a one-time deal. Wipe off excess oil, run scraps of fabric through the thread to catch drips, and check your stitches. Write the date in your journal to keep you on track. These small steps will ensure that your efforts to oil your sewing machine really pay off.
Elon Nelson, owner and operator of Abby Repair, explains the importance of regular lubrication and demonstrates the process using an old sewing machine that hasn’t been used for 15 years. He explains that over time, oil and grease dry out, turning into a hard substance similar to paraffin, which hinders the machine’s operation. The video includes a step-by-step guide on disassembling and cleaning the machine, as well as recommendations for using oil and grease in various parts of the machine.
FAQ
Do I need to put sewing machine oil on a brand new sewing machine before first use?
Most brand new home sewing machines come pre-lubricated at the factory, so you usually don’t oil them right out of the box. Start by sewing normally and just listen for any squeaks or stiffness. If it already sounds smooth and the handwheel turns easily, leave it alone. Adding oil too early can actually make a clean new machine gummy.
Will using sewing machine oil void my sewing machine warranty or service plan?
Using the correct sewing machine oil in the correct places will not normally void a standard sewing machine warranty. Problems happen when people use the wrong oil or drip oil into electronic parts. If a tech sees damage from the wrong lubricant, that can be labeled “misuse.” To stay covered, follow the maintenance section in your owner’s manual and keep notes of what you did.
Is sewing machine oil safe to use around kids and pets, or is sewing machine oil toxic?
Most sewing machine oil is a light, petroleum-based or mineral-based lubricant, so you should treat it like any household chemical. Don’t let kids handle it, don’t leave open bottles near pets, and wipe spills right away. Avoid skin contact and keep it off food surfaces. Store the bottle sealed, upright, and out of reach after every sewing session.
How do I remove sewing machine oil stains from fabric or clothing after oiling my sewing machine?
Blot the fresh sewing machine oil stain fast with a clean paper towel — don’t rub it in. Pre-treat the spot with a little liquid laundry detergent or a small amount of gentle dish soap. Let it sit a few minutes, then rinse with warm water and wash normally. Heat from a dryer can “set” an oil mark, so air-dry first and recheck.
Can I bring sewing machine oil on a plane in my carry-on when I travel with my sewing machine?
Airlines treat sewing machine oil as a liquid, and sometimes as a flammable liquid, so security can take it from your carry-on. The safest move is to pack unopened sewing machine oil in checked baggage with the cap sealed in a leakproof bag. Never travel with a bottle that’s oozing or unlabeled. If you’re unsure, leave the oil home and buy fresh at your destination.
Conclusion
Your sewing machine is your faithful companion. Lubricating its parts is essential maintenance. Use the right products, follow the manuals and instructions, and don’t ignore squeaks or jerks. Avoid compromises (yes, that means no WD-40), and remember: a drop of oil in the right place is better than a squirt in the wrong. With these sewing machine lubrication tips, you’re not just maintaining your tool—you’re preserving your creative companion.
Use this checklist to establish healthy maintenance habits, protect your machine from damage, and ensure every stitch comes out clean and reliable.


